
|
Summary Migrating to Salesforce CPQ requires importing Orders and mapping them to many Salesforce objects (aka “Tables”) in a particular sequence. Fortunately, much of the heavy lifting can be managed using a data pipeline approach.
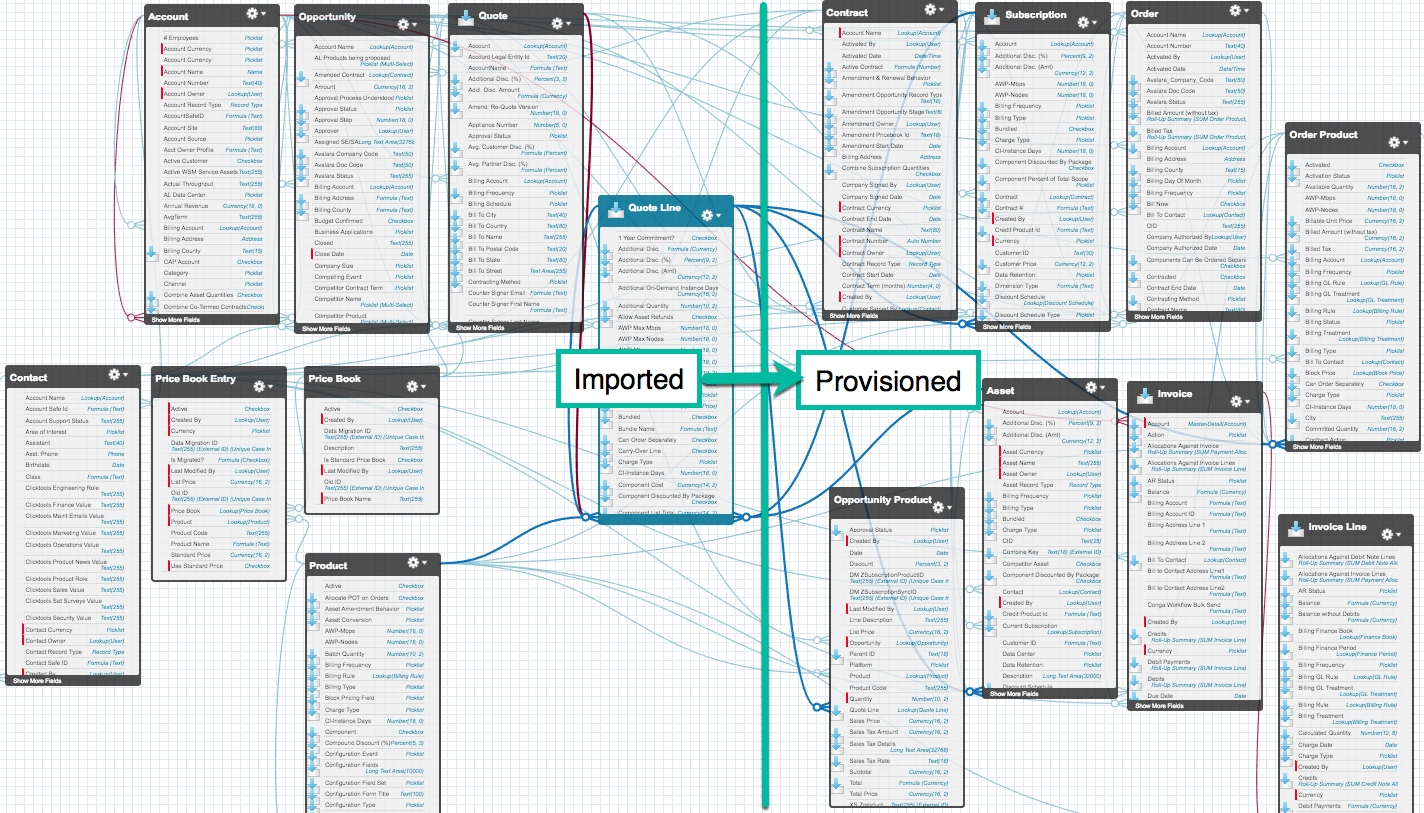
CPQ Data Model Overview There are many objects in the Salesforce CPQ data model, but only 16 objects are essential for a basic data migration. Of the 16 objects, 8 are automatically provisioned by CPQ triggers. 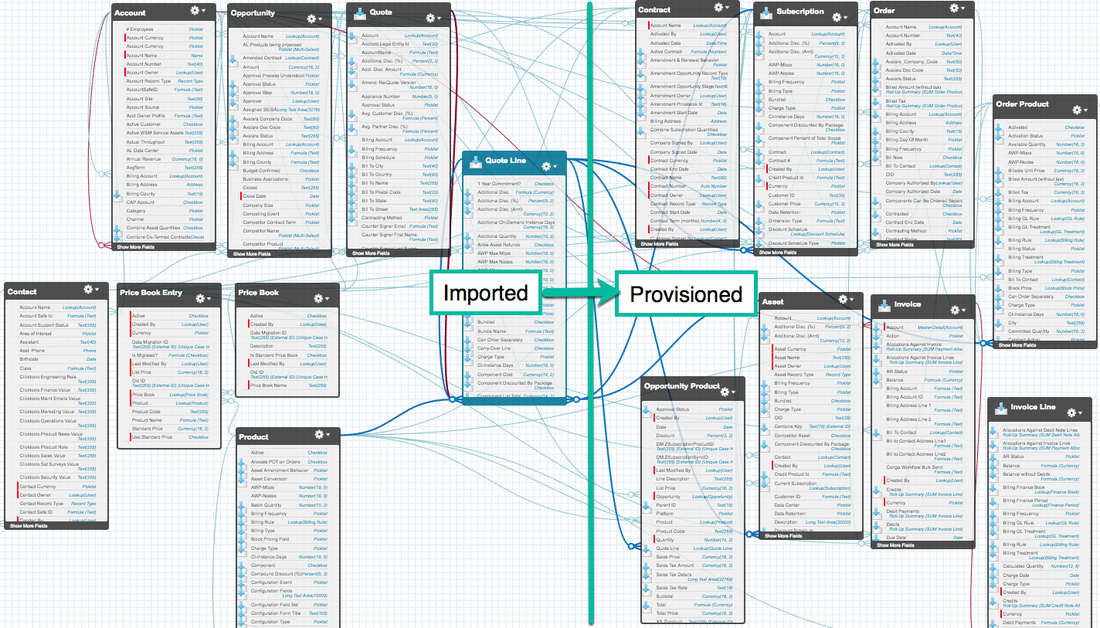
Data Migration Pipeline The migration process is executed in sequential stages. Each stage must be executed and completed in it's entirety before executing the next stage. Some stages are executed by an external ETL process (Extract, Transform, Load). Other stages are executed directly in Salesforce utilizing Batch or Queueueble Apex. During the course of configuring the data migration pipeline, adjustments may only need to be applied to a single stage, thus avoiding a complete re-import of all successive stages. Each stage is idempotent, meaning the process can be executed multiple times without changing the result beyond the initial application. Each stage is guaranteed not to create duplicate records when re-run. This is accomplished by leveraging Salesforce's UPSERT capabilities with unique external ID fields on each object. Concurrent processing is utilized whenever possible to reduce overall stage execution time. Some stages must be executed serially to avoid potential record locking issues. Details for each stage are provided in the section below “Data Pipeline Stages”. 
Measuring Success: Discrepancy Reporting A “successful” CPQ migration is defined as both existing and new systems reconciling and having 0 discrepancies. If a customer is being billed $1,000 USD dollars per month today, they should continue to be invoiced $1,000 USD per month post-migration. Discrepancy reporting typically first occurs after stage 12 in the data pipeline, when the CPQ pricing engine has an opportunity summarize all the line items to each Order. The TCV (Total Contract Value) from the originating system is compared to the TCV calculated by the CPQ pricing engine. Common sources of discrepancies:
Whenever possible, discrepancies are resolved “upstream” by modifying previous stages that ultimately feed the “downstream” CPQ pricing calculation engine. Migrated orders should never be reconciled manually, as that would break the idempotent integrity of the overall process. Future executions of the migration process would overwrite any manual changes. Discrepancy reporting is also commonly done in stage 17. Prior to sending invoices to customers, sample runs are compared to existing invoices to ensure they are consistent. The Cubic Compass solution provides a means for automatically exporting discrepancy reports to CSV format for use in Excel reconciliation. Case Studies Cubic Compass has successfully implemented and evolved this migration framework since Dec 2015. Two example case studies: Customer A: $30M ARR Financial SaaS company. Customer B: $100M ARR Internet Security company. Both customers are primarily subscription-based companies with monthly and annual recurring revenue business models. Customer A Case Study Challenges:
Solution:
Customer B Case Study Challenges:
Data Pipeline Stages 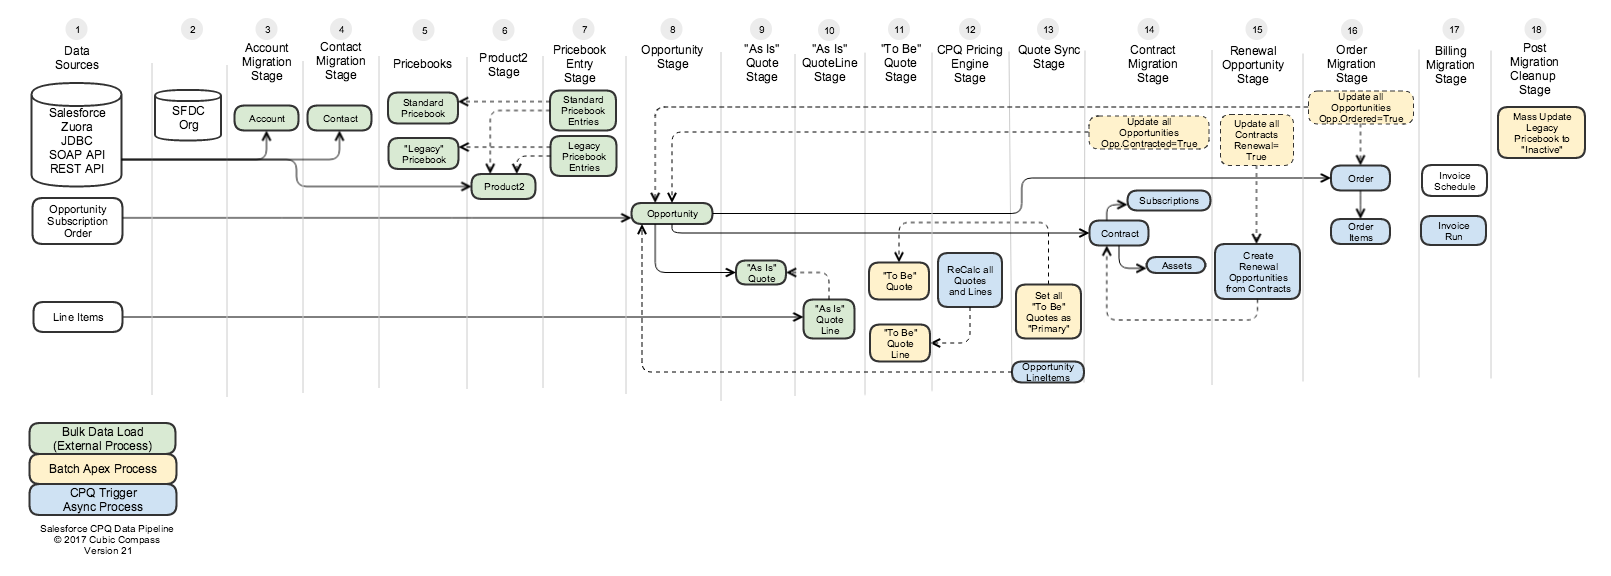 Stage 1: Data Sources
Support for:
Stage 2: Target Salesforce Org The migration is initially configured using a Salesforce Sandbox. Then 1-2 weeks prior to launch, the migration scripts are “replayed” to execute the same stages in a Salesforce production org. Stage 3: Account Migration Accounts are required for billing and are imported using the bulk API. It's common to conduct data cleansing processes in source system prior to migration. Recommend use of data.com and Salesforce Clean utilities. Hierarchical Account migration is supported. For Salesforce-to-Salesforce migrations, the bulk migration stage automatically resolves parent Account IDs to their new record IDs. Stage 4: Contact Migration Billing contacts are required for invoicing. For Salesforce-to-Salesforce migrations, the bulk migration stage automatically resolves parent Account IDs to their new record IDs. Stage 5: Pricebooks This stage automatically creates a pricebook named “Legacy”. Stage 6: Products Instances of products on existing line items are imported as Salesforce Products. For migration projects that are implementing new product catalogs, this stage can optionally be extended to transform and map legacy products to new products. Stage 7: Pricebook Entries Migrate Products are automatically associated with Legacy and Standard pricebooks at this stage. If multi-currency is enabled, a pricebook entry is created per currency. Stage 8: Opportunities Active subscriptions and orders are imported to Salesforce as Closed-Won Opportunities. “In flight” open Opportunities may also be migrated. Stage 9-10: “As Is” Quotes These stages migrate existing subscriptions and order as Salesforce CPQ Quotes. To provision Contracts and Orders in Salesforce requires a historical reference to their corresponding Quote. These Quotes are the cornerstone for provisioning downstream CPQ objects in Salesforce. Stage 11: “To Be” Quote Optional transformation stage for organizations that are converting past and active orders to a new pricebook and product catalog. This is a custom batch Apex stage. Stage 12: CPQ Pricing Engine Stage The CPQ pricing engine summarizes all line items to produce a total amount on the Quote. Migration simply provides the raw Quantity, List Price, Term, and Discount amounts. The termed rollup is calculated by CPQ trigger processes. Discrepancy reports and reconciliation typically starts after this stage is achieved. The Cubic Compass module for this stage has the ability to export CSV files at this stage for use in Excel. Stage 13: Primary Quote Sync Stage Migrated quotes are flagged as “Primary”, which synchronizes the Quote with a standard Salesforce Opportunity and Product Lines. Stage 14: Contracts Salesforce standard Contracts are provisioned at this stage, along with related lists of Subscription and Asset records associated with the Contract. Contract start date, renewal date, and total amount are critical fields to evaluate post-migration. Stage 15: Renewal Opportunities Renewal Opportunities can optionally be provisioned at this stage, allowing for MRR/ARR custom forecasting in Salesforce. Stage 16: Orders Salesforce standard Orders and Line Items are 1:1 generated from CPQ Quotes at this stage. Stage 17: Billing and Invoicing Invoice Schedules and runs may be manually or automatically created at this stage. If credit cards will be used for processing payment, then payment gateway and payment method configuration may be required. Stage 18: Post-Migration Tasks Upon a successful migration, many “scaffolding” Apex classes and records may removed or inactivated. Typically a batch Apex class is maintained to conduct post-migration tasks.
2 Comments
 Software-as-a-Service (SaaS) is fundamentally a subscription business with a mix of recurring software revenue and one-time implementation services. SteelBrick CPQ from Salesforce provides many subscription features out of the box. With some SaaS specific customizations, SteelBrick transforms Salesforce into an extremely powerful tool for forecasting and managing subscription revenue. This article proposes a framework for accelerating the deployment of Salesforce + SteelBrick CPQ to address the needs of SaaS businesses.  1) Understanding SaaS Forecasting Metrics An accelerated path to implementing SteelBrick CPQ for SaaS is to first understand and define which SaaS metrics will be used to measure and forecast revenue. Common metrics that are rolled up at the forecasting level: ACV / ARR: Annual Contract Value (ACV) and Annual Recurring Revenue (ARR) are often used interchangeably. Sometimes ARR is used to only represent monthly or multi-year subscriptions. ARR often requires a “customer churn” metric to reliably forecast revenue. For the purposes of this article, both ACV and ARR represent the annualized revenue from subscription services, exclusive of any one-time charges or professional services. MRR: Monthly Recurring Revenue. ACV and ARR are commonly derived by multiplying MRR (Monthly Recurring Revenue) by 12. MRR may be a more relevant metric for businesses offering month-to-month, or cancel at anytime subscriptions. MCV and TCV: Monthly and Total Contract Value (MCV and TCV) includes subscription revenue plus any one-time charges, such as professional services or setup and installation fees. They are useful for predicting cash flow and renewal revenue, since one-time charges are not carried forward upon subscription renewal. TCV-ACV = Service revenue is a typical calculation. Once the core SaaS metrics for the business are defined, an accelerated path to implementing forecasting for SteelBrick CPQ utilizes a Salesforce feature released in Winter ’15 for predicting revenue based on custom field forecasts.  Once implemented, Executives have access to real-time forecasts of new pipeline, renewals, add-on, and service revenue. 2) Product Configuration Once the core metrics are defined, the implementation starts with a “bottom-up” approach, defining the subscription and service products.  Best practices and tips:
3) Quote Lines SteelBrick Quotes are comprised of many Quote Lines. Each line fundamentally represents a recurring revenue subscription or a one-time service. Actual MCV and ACV values are calculated at this tier, then are rolled up by parent objects. Best practices and tips:
4) Quotes The SteelBrick calculation engine is extremely powerful. The Quote tier is where values from the SteelBrick line item editor are merged with SaaS metrics and subscription term, then fed into the SteelBrick calculation engine to produce a detailed quote, order, or contract. Best practices and tips:
 A note on approvals. SteelBrick natively implements approvals on Opportunities. But in our experience, SaaS businesses may iterate on several Quotes before finalizing an order, each one possibly requiring approval. Therefore, approvals are best implemented on Quotes. 5 & 6) Opportunity and Line Items SteelBrick will automatically synchronize quotes with the parent Opportunity and Line Items. Opportunities are the final tier for staging revenue for forecasting, so additional formula and roll-up fields are added for more granular reporting on New vs Add-On vs Renewal revenue. Best practices and tips:
The Final Solution Rolling up SaaS product definitions from quote lines to opportunities results in a powerful forecasting environment for managing a SaaS business on Salesforce using the subscription, calculation, contracting, quoting, and renewal capabilities of SteelBrick CPQ. This approach is not limited to just SaaS companies. Any subscription business model; such as advertising, video, consumer “product of the month” clubs, and maintenance contracts; can reliably forecast and manage their businesses using this model. 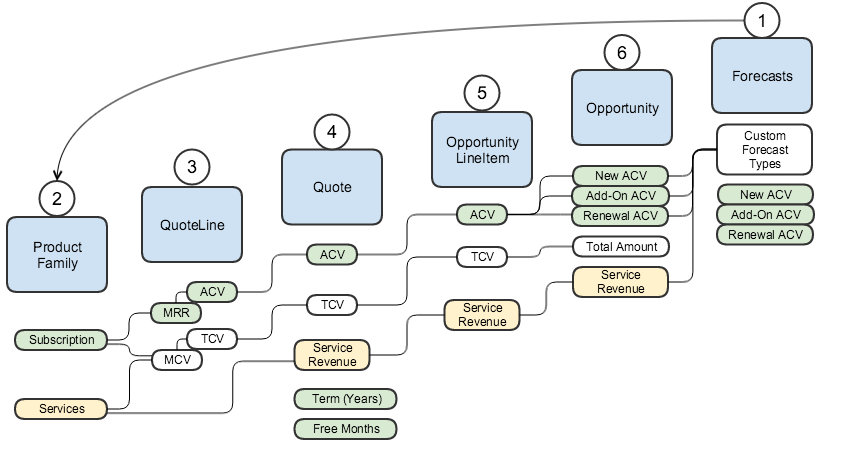 Once revenue metrics are well defined, SteelBrick CPQ and Salesforce can be customized to support many other facets of the SaaS sales process.
Future articles:
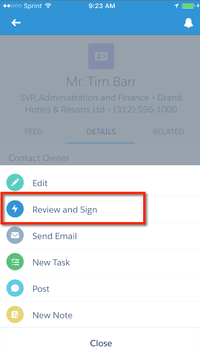
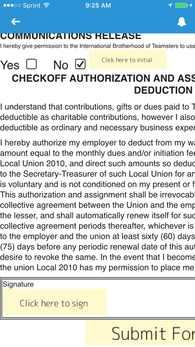
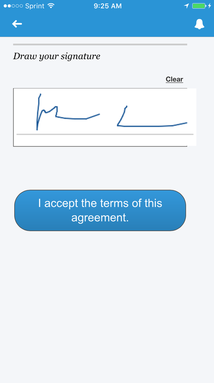
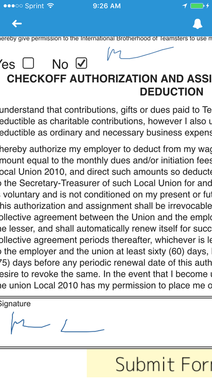
Contact us to learn more. Quick tip: Need to mass object several Salesforce profile object and field permissions? Use the "Check All" chrome plugin (Link to plugin). To enable only the Read checkboxes, use the following "Check All In Element" selector: td[class*="readonlyCol"] To enable only the Edit checkboxes: td[class*="displayedCol"] (Updates: via @dhoechst: there's also this plugin more specifically suited to the task. April '16: Updated regex syntax for matching columns to reflect recent changes in Summer '16)  Closing deals doesn't get any faster when eSignatures are captured in-person using Salesforce1. With the Salesforce1 mobile application, Salespeople configure orders and hand the smartphone over to the customer for immediate review and eSignature. Custom mobile application developed using the Cubic Compass Lightning Accelerator.
eSigned documents are attached to Salesforce records and emailed as a attachments to the customer. Lightning process builder kicks-off any order fulfillment workflow processes. Signed and done... all using the power of Salesforce1 Mobile!
Won't you listen 'cos I'm at it again
The Salesforce Lightning Design System provides a library of pre-built UI elements.
"Thinking in React" is essentially the art of breaking down larger user interfaces into several smaller components. Combined, the two provide an extremely powerful framework for building interactive user interfaces in Salesforce. 
Lightning Tabs
Let's use the Lightning Tabs component as an example. After pasting the example code into a Visualforce page, a very nicely formatted navigation menu will appear in the page. 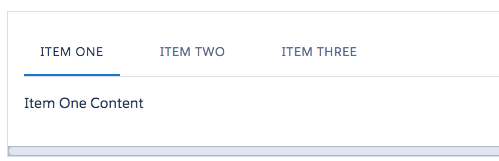
However, without Javascript, clicking on the tabs will have no effect.
To make this navigation tab interactive, we'll wrap the individual Tab components in React classes. We begin by deconstructing the Tab UI down into smaller classes that can be implemented in React. A hierarchy of React components representing a Lightning tab navigation: App (The application container) Tabs (A collection of tabs) Tab (A single tab instance) Content (Content associated with a tab) Data ReactJS components "react" to changes in data state. The data we're going to inject into this application is an array of Tabs, defined as follows:
    var tabList = [
      { 'index': 0, 'title': 'Item One', 'content':
        <div id="tab-scoped-0" class="slds-tabs__content slds-show" role="tabpanel">
            <h2>Item One Content</h2>
        </div>
      },
      { 'index': 1, 'title': 'Item Two', 'content':
        <div id="tab-scoped-1" class="slds-tabs__content slds-show" role="tabpanel">
            <h2>Item Two Content</h2>
        </div>
            },
      { 'index': 2, 'title': 'Item Three', 'content':
        <div id="tab-scoped-2" class="slds-tabs__content slds-show" role="tabpanel">
            <h2>Item Three Content</h2>
        </div>
      }
    ];
App Now this is where the ReactJS framework comes into play. The App class provides the outermost container for the entire application. The state of which tab is currently selected is managed in the App class.
    var App = React.createClass({
      getInitialState: function () {
        return {
          tabList: tabList,
          currentTab: 0
        };
      },

      changeTab: function(tab) {
        this.setState({ currentTab: tab.index });
      },

      render: function(){
        return(
          <div className="slds">
            <Tabs
              currentTab={this.state.currentTab}
              tabList={this.state.tabList}
              changeTab={this.changeTab}
            />
                  {this.state.tabList[this.state.currentTab].content}
          </div>
        )
      }
    });
Tabs The App.render() method constructs a Tabs class, which is a container for many individual tabs.
    var Tabs = React.createClass({
      handleClick: function(tab){
                this.props.changeTab(tab);
      },

      render: function(){
        return (
          <div className="slds-tabs--scoped">
          <ul className="slds-tabs--scoped__nav" role="tablist">
          {this.props.tabList.map(function(tab) {
            return (
              <Tab
                handleClick={this.handleClick.bind(this, tab)}
                index={tab.index}
                title={tab.title}
                isCurrent={(this.props.currentTab === tab.index)}
              />
            );
          }.bind(this))}
          </ul>
          </div>
        );
      }
    });
Tab The majority of dynamic rendering occurs in the Tab class.
    var Tab = React.createClass({
      handleClick: function(e){
        this.props.handleClick();
      },

      render: function(){
        var tabClass = "slds-tabs__item slds-text-heading--label";
        tabClass += (this.props.isCurrent ? ' slds-active' : '');
                var selected = (this.props.isCurrent ? 'true' : 'false');
                var path = '#' + encodeURIComponent( this.props.title.toLowerCase() );
                var controls = 'tab-scoped-' + this.props.index;
        return (
          <li className={tabClass} title={this.props.title} role="presentation"><a href={path} onClick={this.handleClick} role="tab" tabindex={this.props.index} aria-selected={selected} aria-controls={controls}>{this.props.title}</a></li>
        )
      }
    });
Finally, this snippet of code sets the whole interactive model in motion. It creates an instance of the <App/> class within the document <body> tag.
    React.render(
      <App />,
      document.body
    );
Event Handling You'll notice that the Tab onClick event gets bubbled up through the Tabs container, and is ultimately handled by the App class. Events are handled at the most appropriate scope in an application. In this case, the App class updates the currentTab variable and the entire DOM is automatically updated to reflect the change in state. Also notice that no dynamic removeClass() or addClass() logic is required to re-render the tabs. This is where the real magic of React is utilized. React manages a virtual DOM (Document Object Model) and diff engine to automatically determine which components in the hierarchy need to be re-rendered every time there is a change in data state. The Whole Enchilada Wrapping Lightning Design Studio components in React classes is a remarkably powerful and efficient combination. An interactive navigation menu can be implemented in under 100 lines of code without writing any custom CSS or complex JS event handlers. Entire source code for this example is below. Need a custom Salesforce application or AppExchange product developed using the latest Lightning design studio components? Contact us for details.
<apex:page showHeader="false" standardStylesheets="false" sidebar="false" applyHtmlTag="false" applyBodyTag="false" docType="html-5.0" cache="false">
<html xmlns="http://www.w3.org/2000/svg" xmlns:xlink="http://www.w3.org/1999/xlink">
  <head>
  <title>App Title</title>
  <apex:stylesheet value="{!URLFOR($Resource.SLDS092, 'assets/styles/salesforce-lightning-design-system-vf.css')}" />
    <script src="https://cdnjs.cloudflare.com/ajax/libs/react/0.14.0/react-dom.min.js"></script>
    <script src="https://cdnjs.cloudflare.com/ajax/libs/react/0.14.0/react.min.js"></script>
  <script src="https://cdnjs.cloudflare.com/ajax/libs/babel-core/5.8.23/browser.min.js"></script>
  <script type="text/babel">
    var tabList = [
      { 'index': 0, 'title': 'Item One', 'content':
        <div id="tab-scoped-0" class="slds-tabs__content slds-show" role="tabpanel">
            <h2>Item One Content</h2>
        </div>
      },
      { 'index': 1, 'title': 'Item Two', 'content':
        <div id="tab-scoped-1" class="slds-tabs__content slds-show" role="tabpanel">
            <h2>Item Two Content</h2>
        </div>
            },
      { 'index': 2, 'title': 'Item Three', 'content':
        <div id="tab-scoped-2" class="slds-tabs__content slds-show" role="tabpanel">
            <h2>Item Three Content</h2>
        </div>
      }
    ];

    var App = React.createClass({
      getInitialState: function () {
        return {
          tabList: tabList,
          currentTab: 0
        };
      },

      changeTab: function(tab) {
        this.setState({ currentTab: tab.index });
      },

      render: function(){
        return(
          <div className="slds">
            <Tabs
              currentTab={this.state.currentTab}
              tabList={this.state.tabList}
              changeTab={this.changeTab}
            />
                  {this.state.tabList[this.state.currentTab].content}
          </div>
        )
      }
    });

    var Tabs = React.createClass({
      handleClick: function(tab){
                this.props.changeTab(tab);
      },

      render: function(){
        return (
          <div className="slds-tabs--scoped">
          <ul className="slds-tabs--scoped__nav" role="tablist">
          {this.props.tabList.map(function(tab) {
            return (
              <Tab
                handleClick={this.handleClick.bind(this, tab)}
                index={tab.index}
                title={tab.title}
                isCurrent={(this.props.currentTab === tab.index)}
              />
            );
          }.bind(this))}
          </ul>
          </div>
        );
      }
    });

    var Tab = React.createClass({
      handleClick: function(e){
        this.props.handleClick();
      },

      render: function(){
        var tabClass = "slds-tabs__item slds-text-heading--label";
        tabClass += (this.props.isCurrent ? ' slds-active' : '');
                var selected = (this.props.isCurrent ? 'true' : 'false');
                var path = '#' + encodeURIComponent( this.props.title.toLowerCase() );
                var controls = 'tab-scoped-' + this.props.index;
        return (
          <li className={tabClass} title={this.props.title} role="presentation"><a href={path} onClick={this.handleClick} role="tab" tabindex={this.props.index} aria-selected={selected} aria-controls={controls}>{this.props.title}</a></li>
        )
      }
    });

    React.render(
      <App />,
      document.body
    );
    </script>
  </head>
  <body></body>
</html>
</apex:page>
|
AuthorMike Leach is Founder and Principal Consultant at Cubic Compass; a software design and development consultancy focused on the Salesforce Force.com platform. Archives
March 2017
Categories |
||||||||||
 RSS Feed
Cubic Compass | PO Box 2582 El Cerrito, CA 94530
[email protected]
[email protected]